Article Summary:
A small number of our customers can’t see their Dropcam or Nest Cam cameras in the Nest app, or they appear in the wrong home. There are several causes for this issue and a few ways to fix it.
Here's a summary of the causes and solutions starting with the most likely and easy to fix. More detailed troubleshooting steps are below:
1. Make sure you're viewing the right home in the Nest app.
2. If all your Nest products are grouped together correctly but the homes are switched, simply rename your homes.
3. If you are a Nest Aware or Dropcam CVR subscriber, give us a call so we can move everything for you. You also may be able to move your other devices yourself.
4. If you don't have a paid Nest Aware or Dropcam CVR subscription, remove your cameras from your Nest Account and re-add them in the right home.

1. Make sure you're viewing the right home in the Nest app
If you can't see your camera in the Nest app, it's probably listed in your second home.
Important: This can happen even if you didn't previously have a second home associated with your Nest Account. Some customers may have had second homes automatically added to their accounts by mistake.
You can check to see if this is the case by tapping the menu button in the top left corner of the Nest app home page. If you see two homes at the bottom of your account page (see the screenshot on the right), select the other home. You'll be automatically taken back to the Nest app home page. You should now see your "missing" camera.
2. Change your home's name and information
If all your Nest and Dropcam products are grouped together correctly but are merely in the wrong home, there's a very simple solution: simply change your home's name and information. Here's how:
Update the address as well to ensure correct local weather, temperature schedules, as well as Energy and Safety History.
Lastly, if you're a Rush Hour Rewards participant, check that your home's energy company is correct.
Note: If you had a second home mistakenly added to your account you can also delete it here by selecting Remove home at the bottom of the screen.
Select the Settings icon in the top right corner of the home screen.

Tap Home info at the top of the menu.
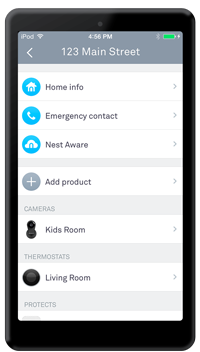
You'll want to check and change all the menu items here, starting with your home's name. You should also make sure that everything in the About sub-menu, such as the type, size, and construction are also updated. This is especially important if you have a Nest Thermostat since this information is used to help save energy.

3. If you have a paid Nest Aware with Video History or Dropcam CVR subscription, contact us:
If you have a paid subscription, please call our support team. We'll fix any issues for you. We only need some basic information about your Nest Account and where you want your cameras moved to.
In some cases, it may be that your cameras are in the right home, but your Nest Protects and thermostats aren't. You can move your thermostats and Nest Protects to the right home without affecting your Video History. However, moving them may cause your Safety History and Energy History to be reset, and your next Home Report results will also be affected.
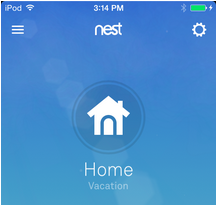
To move a thermostat or Nest Protect, you'll need to remove it from your Nest Account and add it back in the right home. When you add them back to your account, make sure that the right home is active in the Nest app. You can check which one is active by looking at the name beneath the home icon on the Nest app home screen (see the screen to the right). In this case, the Vacation home is selected. To switch, tap the menu icon in the top left of the screen and select the right home.
How to remove a Nest Protect from your Nest Account >
How to set up a 2nd gen Nest Protect with the Nest app >
How to set up a 1st gen Nest Protect >
How to remove a Nest Thermostat from your Nest Account >
How to set up a Nest Thermostat >
4. If you don't have Nest Aware or Dropcam CVR, remove and re-add your cameras
If you don't have a paid Dropcam CVR or Nest Aware subscription, the easiest way to fix the issue is to remove your cameras from your Nest Account, then add them back in the right home. We know this is a hassle, and we apologize for the inconvenience, but since Dropcam and Nest Cam setup is simple, this should only take a few minutes. Here's how:
For more details, please see the following article:
How to remove a camera from your Nest Account >
After you've removed your cameras, please switch to the home where you'd like to move your cameras.
How to set up a camera with the Nest app >
How to set up your camera on a Mac or Windows computer >
Select the camera you want to remove on the Nest app home screen.
Go to settings, and select Remove Camera.

Confirm that you want to remove the camera from your account.

On the Nest app home screen, tap the menu button in the top left corner.
Select the other home at the bottom of the screen. You'll be automatically taken back to the Nest app home page.
Now add each camera to your Nest Account in the right home.